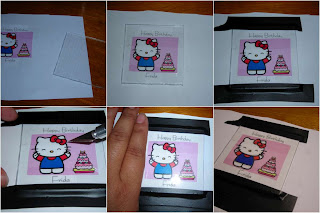
Today is my sister's birthday. We had a grand time celebrating her birthday this weekend, out and about with family and friends. For her birthday, I wanted to make something cool and geeky. :-) I saw this idea during the last Christmas season, from a post on evilmadscientist.com (I wanna explore that site more).
This is actually pretty easy to do if you get past cutting the acrylic sheet to the appropriate size. This one is about 2" x 3" and probably took me about an hour to do because I was using an exacto knife then moved to a box cutter to try to score it deep enough before I eventually snapped the piece off. This was definitely not as easy as it sounded on the site. (Or I did way more work scoring than I needed to do).
Anyway, here's what I did.
Materials:
- Acrylic sheet 2" x 3"
- 1 or 2 LED bulbs
- 1 battery (cr2032 - I just bought one of those flickering LED candles from the dollar tree and grabbed the battery from it)
- black electric tape
- Design you want to etch out (something simple with not too much detail works nice).
- Sharp hobby knife
- Cardstock to make card
How to:
1. Cut the acrylic sheet to fit the design with a bit of space around (maybe half an inch of edge space). I scored it with the hobby (exacto) knife and broke it off. When breaking it off, please be careful to not cut yourself. Use gloves to be safe.
2. Place the acrylic sheet over the design you want to etch out and tape it together to avoid much movement.
3. Using the hobby knife etch in the design by tracing it thru the sheet. It helps look directly above the design you're trying to trace. Also, nice and slow does the trick. It's not a race - so take your time on the curves.

4. Attach the LED light bulbs so the bulb is against the edge of the acrylic. Make sure that the leads for the LED bulb are aligned... positives are on top and negatives are on the bottom or vise versa. You'll want to make sure that the battery will fit okay and the LEDs will light up. I've found success putting a small strip of electric tape along the bottom of the acrylic, turning it over, then positioning the LEDs on the sticky side of the tape.
5. I added a small piece of tape on one half of the battery and insert the battery between both LED leads with the piece of tape end in first. (see picture). Pull up the LED leads on top of the battery just slightly so it doesn't touch the LED unless gently pressed. This will create a make-shift switch so the battery doesn't drain too fast. Tape the battery to the LEDs on the side that you didn't pull the leads up on. Tape the LED bulbs down as well so their position doesn't move and you're covering the stick part of the tape you placed the LED bulbs on in the first place.

6. Using the electric tape, tape up all the edges. This will help the light from "escaping."
7. Attach the acrylic onto some cardstock then attach to a card however way you find.
8. Put a small button or piece of cardstock on the area that is just above the pulled up LED leads with a small note that says Press Here. Make sure to test it out.
9. Put the finishing touches on the card, and place it in the envelope. Placing the card in where the "Press Here" sign is on top is the best way, I found, to put the card in without turning it on.
(Note: for mailing, I'd place a small piece of paper with a pull tab between the leads and the battery to keep it from being on during the entire trip.)

That's it. Pretty easy, right? Enjoy giving out these LED lit cards.
And Happy Birthday, Frida. :-)
2 comments:
Are you FREAKING kidding me?!?!?!?!? One day, I am so gonna print out all these projects and do like one a week. WTF!!! Good job. Once again, mad props to you
Haha... you're too funny. Thanks!
Post a Comment