Showing posts with label paper. Show all posts

Tuesday, October 9, 2012

Washcloth Rose Favors

We used these for our wedding favors.  When I went looking for ideas for favors I wanted something that was gonna be useful to my guests and eye catching.  I saw roses created with a baby spoon and a baby washcloth, and decided to expand on that idea. These are using regular washcloths, a small drinking glass, and a small bottle of hand sanitizer.

Materials:
The glasses I used are from Ikea (love that place).  (http://www.ikea.com/us/en/catalog/products/80094014/)
2 washcloths (one the color of the rose, and one green for leaves)
a dowel (painted green)
hand sanitizer (small ones from Bath and Body Works)

For tags:
Iron-on adhesive,
cardstock (with leave shapes and thanks printed on)
green fabric (for leaves)


1. Fold the colored washcloth diagonally twice.
2. Lay the end of the dowel as shown in the picture, and slowly roll the washcloth around.
3. When you have a couple of inches left, start folding it down while continuing to roll.


4. On the long side of the washcloth, fold up.
5.  Follow the fold and wrap the folded part around the rose (as you would if you were rolling up a sock).
6.  Position and fix so it looks like a rose.


7.  To make the tags, take your printed cardstock (with leaves), and use iron-on adhesive to iron on fabric on the back side.
8.  Cut the leaves out.
9.  Use a hole puncher to punch a hole.
10.  Slip the leaf onto the dowel.  You can put a slight bend on the leaf to help it to hold on the dowel, and for looks because leaves have that natural bend anyway.


Final assembly.
11. Attach the hand sanitizer to the dowel.  Tape seems to work pretty well for us.
12. Lay out a green washcloth, and fold the top and bottom corner in.
13. Stand the hand sanitizer and dowel above the center of the washcloth.
14.  Bring up the sides, hold it and flip the whole thing upside down.  This allows you to fix the green washcloth so it fits nicely into the glass. Slip the glass on top.
15. Flip back right-side down.  Fix the green washcloths so they look like two nice big leaves or a bed of greenery for the the rose.


And that's it. We got a lot of compliments on these favors.


Tuesday, September 20, 2011

Angry Birds Pinata

Last week, a group of us submitted a pinata to a pinata contest at work.  We created an angry bird from the popular video game, "Angry Birds". An entry to the contest included a pinata kit containing a bag of flour, crepe paper, ribbon and a balloon. I didn't get a chance to take pictures as we made the pinata, but here are some pictures of our bird and our setup.


It took us about 4 lunch sessions to finish the bird.
 First session:  Blowing up the balloon, making the paper mache paste (2 parts flour: 3 parts water), and covering up the balloon with paste and newspaper.  We let that dry til our next session.  I'm not sure how long it actually took to dry, maybe a day?

Second session:  We got to pop the balloon (which made the best sound ever as the balloon separated from the dried up newspaper mache form.  We began cutting the crepe paper in strips (about 6 in), and cutting slits in them.  Attaching the crepe paper moved fast and easily, because we attached three crepe paper strips together before attaching them onto the bird.  We also attached the beak and covered it with smoother uncut yellow crepe paper.

Third session:  We continued covering the bird with red and white crepe paper.  We also rolled up some crepe paper and taped it and glued it up on top (also where the balloon hole was).  This formed the top feathers of the bird.  We cut some white and black felt make the eyes and eyebrows. It was mostly complete at this point.

Fourth session:  We used black foam for the tail, made a small slit in the back, to fit it in.  Lastly, we put together some props for our display.  We included a nest with some wooden eggs painted gold and some crocheted angry birds and pigs.

We had completed our pinata, and now awaited its judgement.  We left our display and came back an hour later, where the public voting box was opened so we could cast our votes.  To our dismay, three of our golden eggs were gone.   We had no clue where they went, til someone told us that a blue jay had actually swooped down and stolen the eggs.  We did notice a blue jay in the nearby trees screaming at us while we investigated the disappearance of our eggs... now we know why. Ironically, s/he was quite angry at us.  I guess it tried to get the largest egg as well, but couldn't carry it away.  Hope it's not trying to hatch them.

Anyway, we walked away with the People's Choice Award, T-shirts, a gift certificate, and best of all bragging rights and one heck of a story to tell.  The competition was fierce and the experience was fun.  Here are pictures of the other entries.


Thanks to the Hispanic Leadership Committee for hosting the pinata contest, and a special thanks to my team members who did an absolutely amazing job with the pinata.

For more information about making your own pinata check this site out: http://www.chevroncars.com/learn/fun-games/how-to-make-pinata

Saturday, February 12, 2011

5 minute Valentine's Day Card


Here's a quick card for you to make for Valentine's Day.  Really it can be for any occasion given the design that you choose.  It uses 3 sheets of scrapbook paper (one vellum, one dark color, and one light color), stacked and tied together with a ribbon.


Making them is super easy.  Using a paper trimmer makes it all the more easier. Stack all the papers, choose the height of the card you want, and trim the stack. Fold the stack.


Using an hobby knife, make 2 small slits through all 3 sheets, where the ribbon would go. As long as each slit is equidistant away from the top or bottom.  Slip the ribbon in the slits so both ends of the ribbon are on the outside (vellum side) of the card, and tie a bow.  Trim the excess ribbon and that's it.


You can put whatever you want on the inside of the card, or even just find a nice quotation that you like.

Here's the quote I wrote in this card:
The best and most beautiful things in the world cannot be seen or even heard, but must be felt with the heart
--Helen Keller
I got this idea from the Michael's Book of Arts and Crafts.

Tuesday, February 8, 2011

Decoupage Box


With a bit of work you can decoupage a cheap paper mache box to look like a fancy expensive-ish box.

Here's what you need:


2 sheets of nice scrapbook paper or as much as it will take to cover the box.
1 paper mache box (I got this one for $1 at Joann's)

Here's how I did it:


1.  Cut the paper so it covers the box.  I outlined the bottom of the box onto the paper, then marked the paper to cover the sides. Cut the paper.
2. Any places where the paper edge meet and you're not certain it'll be completely covered, cut a small piece of paper and glue it in place.  For me, it was the side corners of the box.
3.  Double check that the paper is cut to where you want things covered in the box.


4.  Glue the paper to the box using mod podge, and a nice brush.
5.  Wait for it to dry.
6.  Paint on a good coat of glue onto the box.  Putting it over a tin helps let you paint throughout the outside of the box. Let that coat dry and paint on another. I painted on about 5 coats on the outside of the box, and another 5 coats on the inside once the outside was dry.


7.  Do the same procedure for the lid of the box.


That's it, simple decoupaged box.  You can decoupage stickers, or other papers, or even fabric, onto the box the same way.  The box can make a great gift box.  


Sunday, April 18, 2010

Plantable Cards


In celebration of Earth Day later this week,  I thought I'd share this project with you guys.  This is a plantable greeting card.  It's made with used paper, blended to a pulp, with seeds embedded.  The idea is when you give a card to someone, that person can plant the card and get flowers in the near future.  I bet they would make good gift tags as well. 

So here's how to make them.

Materials:
white paper, the more print ink you have on it, the darker gray it is
hot water
seeds
embroidery hoop
screen or tulle fabric
cardboard reverse cut-out of the shape you want.
foil
spatula or something similar to spread
towels for drying.

How to:


1. Tear the paper into small bits. I tore them to about 1 inch squares.

2. Place paper bits in a blender.  Add hot water (enough to cover the water) and blend til it's somewhat smooth pulp.

3. Remove the pulp from a blender, let mixture cool down to room temperature, and stir in the seeds.  (I used a full packet of California Golden Poppies).  The ratio of paper to seed really depends on how dispersed you want the seeds.


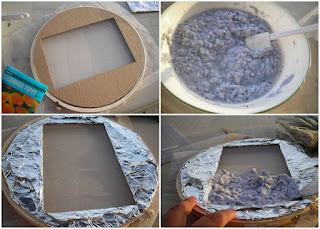
4. Take your cardboard and wrap it in foil.  Stretch the tulle or screen on the embroidery hoop so it's taut.  Place the foil wrapped cardboard shape on top of the embroidery hoop. You're now ready to add the pulp and start making the paper.

5.  Place a towel under the embroidery hoop and screen.  Start spreading the pulp mixture into the card cut out.  Use the spatula to lay the pulp mixture evenly.


6. Remove the cardboard top, and place a towel on top and press down gently.  

7.  Transfer onto the towel by turning over onto the towel, and peeling away the embroidery loop. Place a dry folded towel on top and press down (be sure you're on a flat surface).Let dry on the towel for a full day, or until it's completely dry.  Once it's half dry, if you want to transfer it to a dryer towel, feel free to do so.  


8.  After it's fully dry, carefully fold the paper into a card, and begin to decorate it.  I chose to use simple colored pencils to draw a picture of the flower that the seed represents.  The paper can be planted just like regular seeds.  Just place it on the ground with a  layer of dirt. The card can also be cut into pieces and planted in different locations.

I placed a small piece of the seed paper on top of a sponge in a small saucer with water, so I can take a picture of the seeds sprouting.


That's it.  Enjoy giving out your card. 

Happy Earth Day! Remember to Reduce, Reuse and Recycle.


Thursday, February 11, 2010

Folded Paper Heart Note

 
I learned how to fold these heart notes in high school.  Tho, I never gave them to anyone, I always liked knowing how to fold them.  Anyway, I ran into a folded heart a few days ago, and decided to share a tutorial of how to fold them to you guys as a last minute Valentine's day craft.

I took pictures to do the majority of the talking.

Here goes:


1. Start out with a piece of paper.  Fold in half lengthwise, and then again, so you have the paper folded in quarters.
2. Open up the last fold, and fold top corners to the center line.
3.  Open up the whole paper, and refold with a squash fold technique.
4. Fold up one of the edges that do not fall in the main triangle area (see picture for details)
5. Open up the sheet again, and invert the folded edge into the triangle.


6.  Refold the squashed triangle.  Turn over the paper.
7.  Fold in the top side edges of the paper to the center line.
8.  Fold down the top of the triangle, into the area voided by the side folds.
9.  Turn over the paper.
10.  Fold up the triangle leaves, turn the paper back over.
11.  Fold up the bottom corners of the paper.


12. Slip the folded bottom corner into the center triangle of the heart, repeat for the other bottom corner.
13.  Fold down the top leaves in a bit of an angle so it forms the top portion of the heart.
14. Fold and Slip in the tips of those leaves into the center triangle of the heart.

I repeated the pictures for these last steps, with some lines drawn on the edges for a clearer view.  


That's it.  Now you have a heart.  You can re-open it up, write your note, and refold it.  Makes a perfect homemade special valentine's note.  (The picture on the very top of this post is the back side of the folded heart.)


For information on the nylon flower in the picture at the very top of this post, there is a helpful video to show you how to make the tulip.  The one pictured is using the same technique but on a smaller scale.

Happy Valentine's Day everyone. Have a wonderful weekend.