Showing posts with label knifty knitter. Show all posts

Tuesday, September 22, 2009

Loom Knit Beanies with a Visor


A long time ago, I saw a knitted beanie with a visor featured on one of the RSS feeds I subscribe to. I thought I starred it, but I can't find it. Oh well. Anyway, I ended up googling it and I found that a lot of people were looking for it too. Also, the ones I did find, seemed to be for regular knitting, of which I haven't really gotten a hang of. So, I decided to get the general concept and make my own with a loom.

Here's how I did it.

Materials and tools:

- Knifty Knitter Round Loom (whatever size you want, tho my template was only tested on the green one)
- Yarn (I like the thick wool ease ones)
- This template
- dense cardboard (like the one you find in the back of a notebook)

1. Print out the template and cut it out, then draw that shape onto the notebook cardboard and cut that out.

2. Begin creating the hat just like a regular beanie. Here's a link to a previous post, where I explain how it's done.  Continue til you're going to fold up the brim (just before Step #6.)  The length of step 5 will depend on how wide the template.  The template's width is about 1.5" so you'll want the brim (pre-folded) to be a bit larger than 3" (the additional length is to accommodate for the fold).

3.  Fold up half of the brim, and place the cut out template on the unfolded half.  Continue folding the brim with the cutout within the folded brim.

4.  Continue making the hat following the rest of the directions from the previous post.


5.  Once you've finished off closing the hat, the last thing to do is to slowly turn the brim so that the big curve is on the bottom edge of the brim.

Easy, isn't it? 

Reference: Easy Loom Knit Beanies

Wednesday, August 19, 2009

Cute Ribbon Flowers made with a Flower Loom


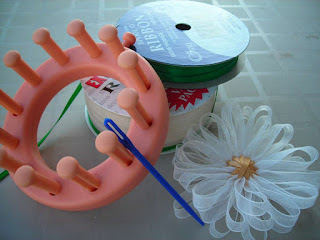
Along with my knifty knitter set, there was a really small loom. According the the pamphlet it's a flower loom. Anyway, I thought I'd give it a shot. Turns out, it makes these really cute flowers that can be used for all sorts of things. I think I'll use them for gift embellishments. You can also use different materials for this loom. Instead of the standard yarn, I'm using ribbon that I found at a near by craft store on sale for 5 for $1 (woohoo).

Here's how you can create the cute flowers with the flower loom.

Materials:

- Ribbon (or yarn) two different colors work best.
- Small Knifty Knitter Flower Loom (peach with 12 pegs)
- Knifty Knitter needle (should have come with the loom)

How To:

1. Tie the end of the ribbon (the one you'll be using for the "petal" part of the flower to the side peg).

2. Loop the ribbon across the loom and around the peg at the opposite end (#6 peg - counting clockwise on the picture).

3. Loop again, across the loom and around the peg at the opposite end (#12 peg - if going clockwise from the side peg).

4. Loop again, across the loom and around the peg at the opposite end (#5 peg).

5. By now you should see a pattern. :-) Continue looping around the peg at the opposite end til you've passed thru 3 times. See the picture of what this should look like.

6. Once you've looped around 3 times, tie the ribbon to the side peg and cut it after the tie.

7. Cut the color of ribbon for the center of the flower to about 1 yard length.


8. Tie one end of the ribbon to the side peg, and thread the other end with the knifty knitter needle.

9. From the back of the loom, insert the needle between the ribbons looped around peg #6 and #7.

10. From the front of the loom, insert the needle between the ribbons looped around peg #12 and #1. Tighten and continue "sewing" between the looped pegs crossing to the opposite opening.

11. Once you're nearly out of ribbon (maybe 3 or so inches), make sure the ribbons end is at the back of the loom.

12. Untie the ribbon (ribbon for center), tied on the side peg.


13. Tie the two ends together using a double knot.

14. Untie the rest of the ribbon on the side peg. Tie these two together using a double knot as well. I also tucked in under the green knot for a cleaner look.

15. Remove the pegs (you should only need to remove half) and remove the flower.


Ta Da, you're done. Aren't they cute?

Check out my other Knifty Knitter projects.

Saturday, February 28, 2009

Easy Loom Knit Beanies

One of my new year resolutions this year is to be more charitable. I wanted to put my new found hobbies into good use by helping out others in one attempt to leave this world better than I found it. In looking for a way to incorporate my crafts into a charitable endeavor, I found this program called HeadHuggers, run by a very nice lady, Sue. She accepts handmade caps and distributes them to hospitals all over, for patients who are undergoing treatment that result into hair loss. There are other programs just like this all over the web if you're interested. Here are a few that I found.

HeadHuggers
Knitting Pals By The Bay
Stitches From The Heart
Newborns in Need
More Charity Links


For my first donation of caps, I decided to make a few of these basic beanies using the knifty knitter. Here's how to make it.

Materials:

Yarn - thickness depends on how warm you want it.
Knifty Knitter Round Looms
Blue for infant
Red for child
Green for adult
Yellow for large adult

How to:

1. Tie the yarn to the outside peg. You'll want to be able to take this off so make sure you can do that... I like to do a crochet chain for the hook.

2. With the pegs facing you and the outside peg on top, start doing e loops (loops that mimic the cursive letter e) around each peg working clockwise.

3. When you've completed one full revolution, push down all of the e loops and go around again.

4. There should now be two loops on each peg of the loom. Turn the loom so the pegs are facing outside, and for each peg, start pulling the bottom loop over the top loop and off the peg. Continue this on all the pegs. This is called knitting off.


5. Now there should be only one loop left on each peg. Wrap the loom again with e loops all the way around (like #2). And Knit off again. Repeat til the knitted part is twice the length of the brim of the hat you want. I made the brim of this hat only about an inch so I knitted til it was about 2 inches.

6. To make the brim, you would, pull up the end of the knitted portion and bring the first row of knits that you did above the peg (from the inside).

7. You should now have two loops on each peg. The first row and the last row that you've knitted. Knit this off.


8. Repeat #5 again til you've reached the length of the beanie that you want to make.

Closing using the gather method

9. Cut the yarn, leaving about a 6 inch tail. Cut another piece of yarn, let's say 1.5 times around the loom.

10. Use the needle that was provided with the loom set and thread the 1.5 length yarn thru it. If you have a hard time putting the yarn thru the needle hole, you can use a small piece of tape to flatten the yarn. Afterwards, just snip that small piece off.

11. Use the needle to thread the yarn thru all of the loops on the pegs. You can begin to remove the already threaded loops off of the peg to give you some slack.

12. When all of the loops are threaded and off the loom, invert the hat so that the hat is inside out.

13. Hold one of the yarns that you threaded thru, and pull so that the end bunches together. Tie a double knot tight. Tie a few more knots with the 6 inch piece that was originally cut and the threaded pieces. Cut all yarns close to the knots. I like leaving small tails of about half an inch to an inch.

That's it. Invert the hat and it's ready to go. (Well, almost, I like to wash it first before I give it away)


If you're interested in donating to some of these charities, check out the websites above, they usually have email addresses to inquire more info from. There's much that can be done to help.

For a bit of variation, try a beanie with a visor.

Recommended Products:

Sunday, November 9, 2008

Loom Knit Slipper Socks


In one of my loom knitting booklets, there are instructions for making a Christmas stocking using a knifty knitter loom. Unfortunately, I misplaced that booklet. :-( Ever since I saw that tho, I've wanted to make some slipper socks for walking around the house in the winter time. I had wanted to make these since I made the scarves, but thanks to California weather just getting cold now (entirely grateful for that... really) I wasn't quite ready to put on such warm socks. Now that the weather is 65 Hi/46 Lo, it's about time to get ready with the socks. (Did I mention that I love California weather?)

Anyway, I went in search for the pattern by of course googling it. :-) That lead me to this really awesome website that had a list of lots of free loom knitting patterns,


and amongst them I found the pattern for these socks.


I followed the steps on this site and figured out a few tips along the way. I chose to hold 2 yarns at the same time for the thickness and to add a bit of tightness to the socks. (The website says that you can try using a garter stitch, but I haven't tried that yet).


So, here's how I made them...
  1. Start with just casting onto the small blue knifty knitter. Then knit on 10 rows. These 10 rows are going to be to form the cuff. If you were making a beanie it would be the brim. :-). To make the brim, reach into the loom, grab the first of the 10 rows, and place them onto the pegs. Now that you have two loops on the peg, knit off. (note: you didn't cast on)

  2. Once you have a cuff, knit another 5 rows (or more if you want a longer sock.. or if you want to make a stocking :-))
  3. These next parts are the trickiest parts of the whole thing. (Don't worry, it's actually not too bad). In the next steps you'll only be working with pegs 1-12 where peg 1 is the first peg you'd cast on. In the next 4 rows, you're going to go back and forth from pegs 1 thru 12. On the turning peg you'll only have one loop. If you look at the picture, you'll see that peg 12 has only one yarn loop on it, and how you'd do a reverse e to loop on peg 11. (BTW, sorry about the picture quality... my camera doesn't like me sometimes). At the end of the 4 rows you should be at peg 1.

  4. Tricky part is almost over – hang in there. This next part is needed so you don't have gaping holes on the sides of the ankles of your socks. We need to decrease the knitting on pegs 1 thru 12 to fill only pegs 4 thru 9. The next 6 rows will take care of this. On the first row, before you cast on, we're going to get rid of the loop on peg 12 by putting that loop on peg 11. Important: The two loops now on peg 11 will act as one loop. Cast on to knit onto pegs 1-11, and knit off. You should now have a free/empty peg 12. Now we'll do the same thing with peg 1, by moving the loop on peg 1 to peg 2, then knitting from peg 11 – 2, leaving a free/empty peg 1. Get the idea? So, we'll do the same thing back and forth til you have 3 free/empty pegs on both sides of the pegs we are working with (1-3 and 10-12 should be free).


  5. Once you have those empty pegs we need to fill them. To correspond with those pegs, there are some loops that look like they need a home. Let's take them home. Find the loops and place them on the pegs. Once all the pegs are filled, cast on and knit off, remember that you're starting from peg 4 now. I went ahead and casted on til I reached the original peg 1. Knitted off all the cast ons.

  6. So, we will now once again be on the original peg 1. Phew, the hard part is over. Congrats for that. Quick tip here: Put a safety pin or in my case a paperclip on the line that connects the last peg knit to the peg just before that. (See picture). This will give us an idea of how many rows we did so we can make the second sock the same length (I know, I'm brilliant ;-) ). Knit the rows til you reach the desired length. I grabbed my sock and put it next to the knitting ankle to ankle and went from there.
    In counting the rows, you'll notice something that looks like a ladder above the paperclip. Basically, you'll count the rungs to the top including the one that the paperclip is on. So, this one has 5 rows on it.

7. Once you've reached the desired length, finish off via the gather method (just like the beanie – which will be my next knifty knitter project posted). Before you finish off tho, count all of the knits from the paperclip to the finish and record, so you know how many rows to do for the second sock. To finish off using the gather method, you'll need the needle that came with the knifty knitter (or in my case a bobby pin – I can't find my needle). Cut the yarn about 5 inches or so from the last peg knitted. Then cut a piece of yarn (or two if you were holding two yarns) to the length of about 1 1/2 times around the loom. Thread the yarn onto your needle or bobby pin and place the loops of the peg from the peg thru the needle. I think it's neater to go the same direction on each peg (coming from the left on the bottom of the peg to the top). Once all of these loops are off the pegs (yay!), carefully invert the sock, inside out. Of the loose yarns, you'll have the following: 1 that ended the from the loom (let's call it line 1), and the 2 ends of the yarn that were threaded onto the needle (let's call these line 2 and 3). Tie knots with line 1 and the second closest yarn (2 or 3). Then pull the other yarn so that the end gathers together (Gather method), and tie more knots (2 with 3 and 1 with 3). On the last, double tie then cut yarn about a half inch from the knots. (It shouldn't come off, and no need to hide it, it's in the sock). Revert the sock back so that out is out and in is in. Don't forget to remove the paperclip.

8. You're done! Try on your sock if you'd like. As a bit of warning, it's a slipper sock, so it will feel really loose. I wear them with regular socks inside... it keeps my socks cleaner. If that doesn't satisfy you, you thread in an elastic garter into the cuff and tie it off. Enjoy your slipper socks.

Monday, September 29, 2008

Simple Knitting Loom Scarf


With Christmas time only a couple of months away, what better time to start making your homemade gifts whether it be for Christmas or for birthday, or just because.


This is a simple project that will be well appreciated during the cold winter months. The pattern is from the Knifty Knitters Assorted Looms book. I'm using the long pink loom for this scarf & will am holding 2 yarns thru out the project. You can also make the scarf by holding only one yarn. 2 yarns gives a thicker, warmer scarf, whereas the 1 yarn is a nice light scarf.


First start by tying down the yarn to the holding peg onto the side of the knitting loom. Leave a nice long tail (maybe 12 to 18 inches) to crochet the beginning of the scarf off (it just looks cleaner that way).


Next, cast on, starting by skipping the first pairless peg and going back and forth till you reach the desired width of the scarf (Remember that this is stretched out a bit as it is). Cast onto an even number of pegs.


Next is the tricky part, turning. Once you've reached the desired width you will turn. You're going to follow the zig-zag pattern from the previous cast on. This means that the turning peg will only have one cast on. This will be true each time you turn.


Pull over the bottom cast on, above the peg on each peg with 2 cast ons. (And you're knitting, isn't it great?) Once you've pulled over all the pegs, turn and cast on again, then knit again. You'll repeat this til you've reached the desired length for the scarf.


Once you've reached the length, you're ready to finish off the scarf and clean up the ends. Here you'll need a crochet hook, use one possibly a bit bigger than the yarn recommendation, or be prepared to crochet somewhat loose.


First you should crochet off from the loom. To do this, you'll unhook the yarn in the first peg and put it on the crochet hook. Next, remove the yarn on the next peg, and place it onto the crochet hook, and pull it thru the first loop in the crochet hook. Continue thru til you're at the end, then cut the yarn and pull the tail thru the last loop on the crochet hook.


For the tail that was left in the beginning you're going to use a single crochet along the edge. First pull a part of the tail thru the first loop (nearest the tail). Then, single crochet along the end.
Here's one that I finished a couple of weeks ago.


That's it. Enjoy your scarf, or enjoy giving your scarf away. :-)