As mentioned in my previous post, Eric and I finally tied the knot on May 12. Our wedding was an intimate home wedding at a rental home in Lake Tahoe, CA. We planned the whole thing in about 4 months and did the majority of the wedding ourselves with the help of some awesome volunteers. Eric did the planning for the food, and setup, while I did the planning for the details and decorations. I thought I'd show off some of our crafty wedding projects. I'll do another post that that covers the food. :)
Both of us are t-shirt and jeans type of people, so the first thing we decided on were that we didn't want to wear dress shoes. So, we decided that
Chuck Taylors would be fun to wear, and is versatile enough that if guests were to wear them, they'd have options. We decided that all of the wedding party should wear chucks, and we added onto the invitation that "Chuck Taylors are suggested, but not required". To our surprise, most of our guests showed up wearing chucks. (yay!).
We decided against a traditional guest book and opted for a glass fishbowl, and a mad-lib type of guest book page. We also created a blank one for those who didn't feel like filling a mad-lib page out. We left stickers, and let people roll up the pages, affix stickers, and throw it into the fishbowl. It was really cool. We had some funny responses, but with great advice. We also decided to order a photobook (actually, I got one free as a gift from David's Bridal, where I bought my dress) that we let people sign. The last picture (bottom right), is a pot of nylon flower pens, so people can write on the pages, etc.
Here's a closer look at the mad-lib page.
The rental house we rented had a downstair game room type area with counters all around. We used these to our advantage, and put all of the guest book things on the counter. We created a card box by using an old picnic basket, and using one of our small chalkboards to tell people that it was a cards box. I actually ended up re-lining the picnic basket because the original lining was red, and our colors (if you haven't noticed yet) were green and yellow.

My sister created this awesome candy bar full of yellow and green candy. There were rock candy, lemonheads, appleheads, yellow, green and white jordan almonds, yellow and green jelly beans and m&m's. Yellow and green lollipops, packets of juicy fruit gum and doublemint gum, lemon drops, frooties, sour apple belts, mango and lychee gel cups, and hugs and kisses (with little dot stickers on them - designed and cut out by us). She made these cool circular fan decorations, that I think she found in Pinterest (love that site). Also, instead of making a slide show of pictures, we opted for getting a few digital picture frames, and just letting it run with our pictures on them. It was easy, and let people view them if they wanted, or not, if they didn't. You can see one of the frames at the end of the candy bar.

We also did our own flowers. I watched tons of youtube videos, and learned to make bouquets corsages, and boutonnieres. My mom did the arrangements for the urns that we used for decorations for the ceremony site. For centerpieces (not pictured), we used small bottles and put a few flowers in each. This worked great because our tables were rectangular, so we didn't want tall flowers that would just get in the way, plus this gave us more room for the wine and champagne glasses (important stuff!). And with the rest of the flowers, several of us just had fun and tried our hand at arranging the remaining flowers in the remaining vases. They all turned out really good and really put color around the reception areas. We bought most of the flowers (roses, and carnations) thru costco.com.

For favors, I wanted something that would look great, and would be useful to people after the wedding, so I came up with these. Each favor consisted of 2 washcloths, a small glass, and an antibacterial bottle. I finished it off a tag shaped like a leaf. I'll have a tutorial on this later.

Here are some other random things we had. First we had our memorial candles. I bought two candles from ikea, and two decals from Joann's. The directions for the decals were easy enough to follow. Below the candles is the tray Eric made out of acrylic to hold our veggie shooters. The tray is basically an acrylic sheet with legs, that has drilled out holes. The shot glasses we used for the shooters were small square plastic shot glasses that fit the holes so that people can easily pick up each one. It's actually quite brilliant because it made set up super easy. The middle picture is how our table setting looked. We cut burlap into strips and used that as a table runner, added the small vases of yellow and white flowers, and added a thick green ribbon around the napkin for color. We used the chalkboard paint to create a larger chalkboard sign for the self serve wine bar. Hanging off of the sign is one of the pomander (kissing) balls I posted about a few posts ago. We used them for aisle decorations, which you can sort of see in the picture on the bottom right.
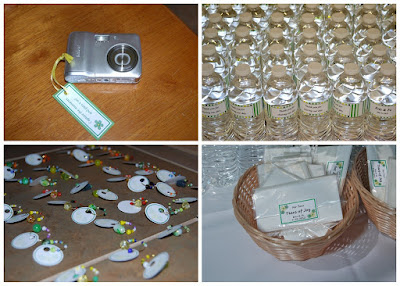
This last picture are some other random projects. I took my old digital camera, added a little label to tell people to "Capture the memories, and pass it on." With fresh batteries and a large memory card, we got some really cool pictures. We designed and printed our own water bottle labels. I also created wine glass charms with little tags that people could write their names on. And lastly, I created little "Tears of Joy" packets, which were small packets with two tissues in them.
A few other things we did was set up a photo booth. We bought an HD webcam, a license for some webcam software, and printed up or bought a bunch of photo booth props. We also bought a small photo printer, hung some fabric for background and voila -- our own photo booth. Everyone loved it! I forgot to take pictures of the setup, but here's our photo booth photo.
Anyway, I hope you enjoyed the overview of our DIY wedding. It was super fun. I'll get a food post together soon. :)


