Monday, August 31, 2009

Rad Linc Crafts Turns One! Happy Blogoversary to me!


Today will be one year since I ventured forth and decided to make this blog. I honestly can't believe it's been that long. Wow, and what an adventure it's been. Just looking at the tag cloud to the right, we've covered a lot of ground. Yet there's still so much out there that I haven't tried.

Anyway, just wanted to say, thanks for sticking with me thru it all. I hope you're able to join me with my future adventures.

For this post, I thought I'd share the top ten blog projects from this past year.

10. Hanging Tomato Plant. There are actually a few posts of this tomato plant because of some updates. This year we ended up with 4 cherry tomato plants in the bucket. They're quite the tasty tomatoes -- but I think next year I'd like to plant some roma tomatoes in the same style. The best part about the hanging tomato plant, IMO, is that you don't have to bend down to pick them. I occasionally sit down right next to the plant, with my laptop and pick on the low hanging fruit ;-). Update 1, Update 2


9. LED lit birthday card. I enjoyed making this card very much. In the past couple of years, I've been fascinated with LED lights and how I might be able to incorporate them into projects. This was one of those projects. Plus, I thought my sister would get a kick out of it.


8. DIY Super Easy and Inexpensive Dog Leash. I still use these leashes when I walk my dogs. I've thought about making one that Y's out to both dogs. Maybe I'll visit that in a future project.


7. Cute Ribbon Flowers Made With a Flower Loom. This is one of my more recent posts. I've only made a couple of these. I actually want to revisit this project and try making a ribbon flower via a homemade loom instead of the knifty knitter loom. Right now, I'm thinking of using cardboard. hmmm.


6. Marshmallow Shooter Automatic. This was one of my first projects. They were definitely fun to play with. We actually played with it quite a bit at my sister and friend's empty apartment party. Cleanup wasn't too bad, but we were being careful not to step all over them.


5. DIY Aquarium Plant Rock Base. The popularity of this one is a bit of a surprise to me. I didn't think there would be a lot of people interested in aquarium crafts. It's a pleasant surpise. My plant and it's rock base is still entact and in the same corner I left it in. :-)


4. Easy Loom Knit Beanies. My friend. Alicia got me started in loom knitting and particularly loom knitting beanies. In fact, she gave me my first handmade beanie as a Christmas gift. The beanie is awesome, and super warm. It's actually so warm that I can't wear it for too long before my head gets too warm. I love my purple and black beanie, tho. Thanks Alicia.


3. Knot Friendship Bracelet. I've been wearing this type of bracelet for nearly 1 1/2 years now. It's a remembrance for me of someone lost but never forgotten. While the colors change occasionally, the meaning will stay the same. I'm glad of it's popularity, as it means people are making them whether it be for themselves or to celebrate friendship, etc.


2. Crocheted Bubble Baby Blanket. I really like this pattern, not just because it looks great, but because it's simple and fast. I've made about 4 baby blankets so far with this pattern.


1. Kusudama Flower. I had fun making this kusudama flower. One of these days, I think I'm going to make a bunch of these and put it together to make a kusudama ball. It really is amazing to think that the whole thing was made of paper (and a little glue). I think I'll try setting one up with some LED lights. :-)


Here's a list of a few other projects that you may have missed.

Boomerang
Cold Brewed Coffee
Fleece Dog Toys
Fabric Gift Tags
Cinch Bags
Gift Card Holders
Tea Bag Wallet
Messenger Bag
Reusable Sandwich Wrap
Shabu Shabu

Anyway, thanks again for coming by and celebrating with me. Coming up soon, DIY TV Stand, Crockpot Tomato Sauce, and Plantain Chips. Off to my next big adventure.

Friday, August 21, 2009

Freezer Banana Muffins


It's been nearly a year ago since I found this recipe online and I've already made it several times. I found this recipe from a site called CatCanCook, who claims this recipe to be fool proof. Well, it pretty much is. It's an easy 8 ingredient (9 if you count my vanilla) recipe that will have you eating banana muffins in almost no time.

Because the link above has the recipe and I really didn't change anything but multiplying the recipe by 4 and adding 4 tsp of vanilla to it, I thought I'd spare you with the task of rereading the recipe. Instead, I'll just share the pictures of my experience, as well as tips I've discovered when baking these in bulk.


Tip 1: You can freeze bananas when they're spotted and brown and no one wants to eat them, then use them for this recipe. It works out great. Just toss the bananas in the freezer (no bag needed unless you want to bag them), then when you have a good pile, defrost it for a minute in the microwave, and peel them into a bowl.

Tip 2: Some say to use a fork to mash the bananas... I say, if you have one, use a potato masher. Seriously, it works great. I then finished it off with my mixer when mixing it in with all the other wet ingredients.

Tip 3: When making this in bulk, make sure you have a big enough bowl. As you can see in the picture, my bowl was close to it's maximum. Phew.


Tip 4: Have more than one muffin pan. This would have been an enormous help, because I could have had one to set up while the other one was baking. Or I could have used both racks of the oven. At any rate, it would have been a good energy saver, time saver, and temperature saver (hot summer + oven on, not a good combination) had I used more than my one muffin pan. Next time, I know.

Tip 5: Use an ice cream scooper to fill the muffin pans. I found that it was easy to use, and gave uniform scoops of batter.

Tip 6: Use a skewer stick to check doneness by poking in the middle muffins and checking if the stick comes out clean.


Tip 7: If you're not planning on eating all of these muffins, and would rather have a few in the ready when you feel like eating one, they're freezable. Once the muffins were completely cooled down, I placed 12 in a zip lock freezer bag, and tossed it (well, gently placed it) in the freezer. To reheat, just let stand out for a bit til it's completely defrosted, or microwave for 30 seconds. It'll be nearly as good as when you first baked it.

Tip 8: Don't forget to enjoy one fresh from the oven (when I say fresh, I mean, after it's cooled off just a little so you don't burn yourself). It's a wonderful way of celebrating your success. :)

These make a good, quick breakfast, or a good, between meal snack. With all of the back to school mayhem that I'm sure people are enduring, this is bound to help out.

Enjoy!

Wednesday, August 19, 2009

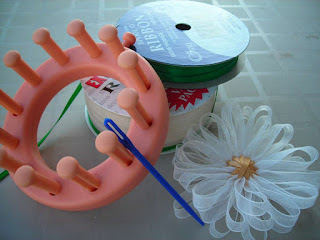
Cute Ribbon Flowers made with a Flower Loom


Along with my knifty knitter set, there was a really small loom. According the the pamphlet it's a flower loom. Anyway, I thought I'd give it a shot. Turns out, it makes these really cute flowers that can be used for all sorts of things. I think I'll use them for gift embellishments. You can also use different materials for this loom. Instead of the standard yarn, I'm using ribbon that I found at a near by craft store on sale for 5 for $1 (woohoo).

Here's how you can create the cute flowers with the flower loom.

Materials:

- Ribbon (or yarn) two different colors work best.
- Small Knifty Knitter Flower Loom (peach with 12 pegs)
- Knifty Knitter needle (should have come with the loom)

How To:

1. Tie the end of the ribbon (the one you'll be using for the "petal" part of the flower to the side peg).

2. Loop the ribbon across the loom and around the peg at the opposite end (#6 peg - counting clockwise on the picture).

3. Loop again, across the loom and around the peg at the opposite end (#12 peg - if going clockwise from the side peg).

4. Loop again, across the loom and around the peg at the opposite end (#5 peg).

5. By now you should see a pattern. :-) Continue looping around the peg at the opposite end til you've passed thru 3 times. See the picture of what this should look like.

6. Once you've looped around 3 times, tie the ribbon to the side peg and cut it after the tie.

7. Cut the color of ribbon for the center of the flower to about 1 yard length.


8. Tie one end of the ribbon to the side peg, and thread the other end with the knifty knitter needle.

9. From the back of the loom, insert the needle between the ribbons looped around peg #6 and #7.

10. From the front of the loom, insert the needle between the ribbons looped around peg #12 and #1. Tighten and continue "sewing" between the looped pegs crossing to the opposite opening.

11. Once you're nearly out of ribbon (maybe 3 or so inches), make sure the ribbons end is at the back of the loom.

12. Untie the ribbon (ribbon for center), tied on the side peg.


13. Tie the two ends together using a double knot.

14. Untie the rest of the ribbon on the side peg. Tie these two together using a double knot as well. I also tucked in under the green knot for a cleaner look.

15. Remove the pegs (you should only need to remove half) and remove the flower.


Ta Da, you're done. Aren't they cute?

Check out my other Knifty Knitter projects.

Sunday, August 16, 2009

Rad Linc Crafts' New Look

In anticipation for my very first blogoversary, coming up in a couple of weeks, I decided to make some change on the blog. Over the past couple of days, I've been tweaking things, here and there within the Rad Linc Crafts blog. What lies before you is the results of my recent tweaking. It feels nice to step away from the standard blogger templates, even if I only stepped a few inches away.

Some of my intentions of changing the looks of this blog was to allow for better/more inviting browsability as well as individualizing my blog to make it look more like... well, "my" blog.

You'll noticed that the right side bar is now dedicated to browsing around the blog with the "recent posts" area and the tag cloud being the predominant sections. The blog archive is still there, but with much less real estate.

You'll also notice the banner has changed from a flowery green picture to a personalized version created by yours truly :-), depicting my dogs as the inspiration of the name of this blog. You'll probably see changes occasionally as I continue to tweak the banner to my liking.

Along the left side bar, you'll notice things like my profile description, and a hand picked selection of the blogs that I read quite regularly.

So, browse around the "new" site and feel free to leave me comments on what you think. Also, I apologize in advance for possible changes in the next few weeks. Everytime I think I'm done with changes, I find one more thing I want to change.

Happy browsing, and thanks a bunch for reading!!!

Thursday, August 13, 2009

Knot Friendship Bracelet

Wikipedia describes friendship bracelets as special bracelets given from one friend to another as a symbol of friendship. These kinds of bracelets are definitely known more by the name friendship bracelet, but it doesn't have to just be a symbol of friendship.

One of my friends recently shared a tradition with us about creating these bracelets before heading off to a journey. Thus allowing it to represent the memories of that journey. Along the same lines, the bracelet can represent a memorial or a remembrance of a passed away friend or loved one. It can be worn to represent your loyalty to a school or favorite team, or maybe to represent you by showing off your favorite colors.

Which ever reason you choose to make or wear one, this bracelet is quick and easy to make and looks good.

Here's how I made them.

Materials:
- DMC thread (two colors of your choice)
- Some way to hold it in place. ( I used binder clips and a candle jar)

How To:

1. Cut one of each color of DMC thread to the length of about 1.5 yards each and fold in half and place both threads together.

2. Holding both threads together make a knot about an inch away from the fold.

3. Loop thru a binder clip and clip somewhere, or find some other way to secure it to a place where you can begin making the bracelet.

4. Separate the two colors. It's important that throughout the process keep the colors on their correct sides. In this case, yellow on the left, and black on the right. If you don't, you get weird twists and irregularities in the bracelet.

5. Keeping the right thread (black) straight, make a knot (sorta like an upside down figure 4) using the left thread. Tighten knot to the top of bracelet.


6. Do the same as step 5 with the left thread (yellow) straight, and making a knot with the right thread. Tighten again.

7. Continue to do step 5 and 6 til the bracelet is as long as you want it to be.

8. When you've reached the desired length, remove the bracelet from however you held it in place. Don't cut the excess thread til you're ready to tie it on your wrist or someone else's wrist.


9. Tie it on someone's wrist. I find it works best to thread one of the sides of the bracelet (yellow or black threads) thru the top loop (the loop that was at the top of the bracelet), then tie knots. 3 knots work well. Then I make knots on each side (on the yellow threads, then on the black threads). Afterwards, I cut the threads just after the last knots.

Ta Da! The colors I chose, yellow and black are for the Steelers, my bro's favorite team.